RabbitMQ stands as a cornerstone in message brokers, offering a robust, open-source solution that facilitates seamless communication between applications. It supports various messaging protocols and streaming, making it versatile across different operating environments.
With its ability to run on numerous operating systems and offer cloud services, RabbitMQ has established itself as a reliable choice for developers seeking efficient message queuing and delivery mechanisms. Its latest version, 3.12.13, released on February 22, underscores its continuous evolution and commitment to providing better error handling and performance improvements.
ON THIS PAGE
Why Choose RabbitMQ?
RabbitMQ’s appeal lies in its capability to offload heavy tasks from web application servers, thereby reducing load and improving delivery times. This is achieved by delegating tasks to a third-party service, allowing asynchronous processing within software systems. Such functionality is particularly beneficial in scenarios where tasks require significant time or resources, enabling smoother operations and enhanced efficiency.
Key Components of RabbitMQ

Producer (Publisher)
The publisher acts as the originator of messages, pushing user requests to an exchange. These requests can range from complex tasks to simple broadcasts, serving as the initial step in the message lifecycle. Publishers direct their messages toward a destination determined by the underlying protocol, setting the stage for subsequent processing.
Broker
The broker plays a crucial role in determining the path of each message. By applying routing rules known as ‘Bindings’, it establishes connections between exchanges and queues, facilitating the asynchronous transfer of messages. This mechanism ensures that messages reach their intended destinations efficiently and accurately.
Consumer
Consumers represent the systems that retrieve and process messages from the queue. They operate independently, extracting information from the queue and handling each message according to predefined logic. This component is essential for executing the actual work associated with the received messages, completing the cycle initiated by the publishers.
Installation and Configuration of RabbitMQ
Installing RabbitMQ
To get started with RabbitMQ, installation is straightforward on Linux systems using the following commands:
sudo apt-get install rabbitmq-server
sudo rabbitmq-plugins enable rabbitmq_management
Creating a User
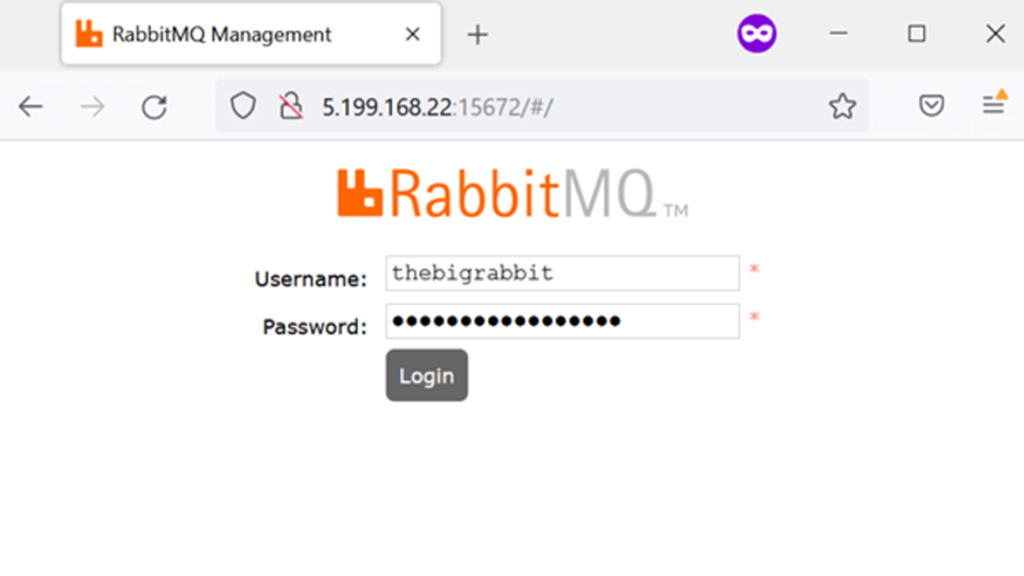
After installation, creating a user is a critical security measure. Here’s how to add a new user and assign permissions:
sudo rabbitmqctl add_user dckap dckap@123
sudo rabbitmqctl set_user_tags dckap administrator
sudo rabbitmqctl set_permissions -p / dckap ".*" ".*" ".*"
Admin Login Page:
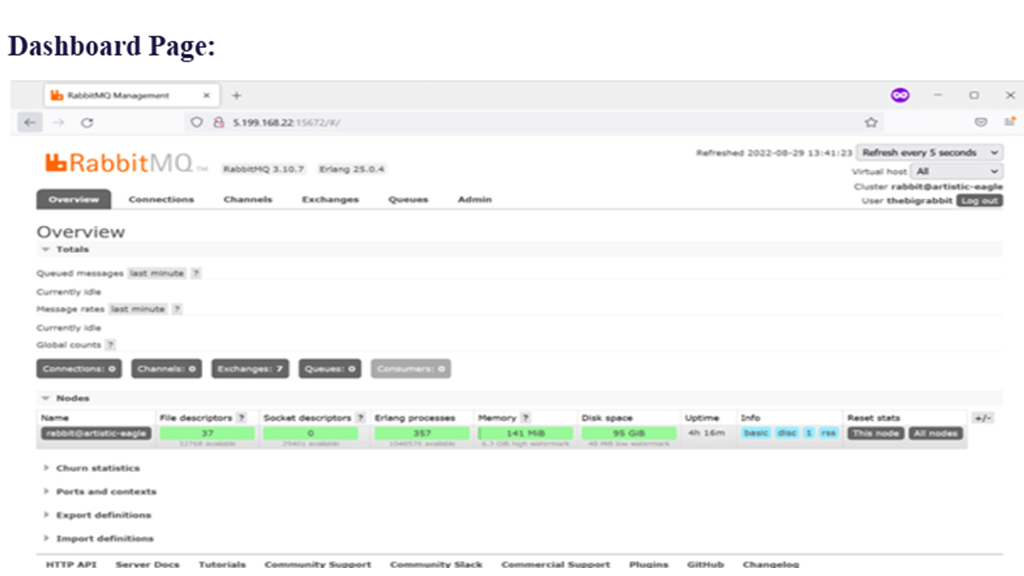
Dashboard Page:
Configuring RabbitMQ in Magento 2
Integrating RabbitMQ with Magento 2 involves defining environment variables in the app/etc/env.php file. This setup allows Magento to communicate with RabbitMQ effectively:
'queue' => [
   'amqp' => [
       'host' => '127.0.0.1',
       'port' => '5672',
       'user' => 'dckap',
       'password' => 'dckap',
       'virtualhost' => '/',
       'ssl' => false
   ]
]
Configuring Message Queue Topology in Magento 2
Understanding the message queue topology is vital for effective communication between components. This section outlines the configuration files required for setting up a basic messaging scenario in Magento 2.
Communication Configuration
The communication.xml file defines the topics used for communication.Create communication.xml in magento-root/app/code/Vendor/Module/etc folder:<?xml version="1.0"?>
<config xmlns:xsi="http://www.w3.org/2001/XMLSchema-instance" xsi:noNamespaceSchemaLocation="urn:magento:framework:Communication/etc/communication.xsd">
<topic name="dckap.magento.product.save" request="string"/>
</config>
Publisher Configuration
The queue_publisher.xml file specifies the exchange where a topic is published.Create queue_publisher.xml in magento-root/app/code/Vendor/Module/etc folder:<?xml version="1.0"?>
<config xmlns:xsi="http://www.w3.org/2001/XMLSchema-instance" xsi:noNamespaceSchemaLocation="urn:magento:framework-message-queue:etc/publisher.xsd">
<publisher topic="dckap.magento.product.save">
<connection name="amqp" exchange="dckap.magento.product.save" />
</publisher>
</config>Create the publisher class that will publish messages to the queue. Save this file as Publisher.php in the magento-root/app/code/Vendor/Module/Model/MessageQueues/Product directory.
<?php
namespace Vendor\Module\Model\MessageQueues\Product;

use Magento\Framework\MessageQueue\PublisherInterface;

/**
 * Class Publisher
 * @package Vendor\Module\Model\MessageQueues\Product
 */
class Publisher
{
    const TOPIC_NAME = 'dckap.magento.product.save';
    /**
     * @var PublisherInterface
     */
    private $publisher;
    /**
     * Publisher constructor.
     * @param PublisherInterface $publisher
     */
    public function __construct(PublisherInterface $publisher)
    {
        $this->publisher = $publisher;
    }
    /**
     * Publish data to the queue
     * @param string $_data
     */
    public function execute(string $_data)
    {
        $this->publisher->publish(self::TOPIC_NAME, $_data);
    }
}
Consumer Configuration
The queue_consumer.xml file specifies the relationship between a queue and its consumer.
Create queue_consumer.xml in magento-root/app/code/Vendor/Module/etc folder:
<?xml version="1.0"?>
<config xmlns:xsi="http://www.w3.org/2001/XMLSchema-instance" xsi:noNamespaceSchemaLocation="urn:magento:framework-message-queue:etc/queue_consumer.xsd">
<consumer name="dckap_product_save" queue="dckap_product_save" connection="amqp" handler="Vendor\Module\Model\MessageQueues\Product\Consumer::processMessage"/>
</config>Create the consumer class that will handle the messages from the queue. Save this file as Consumer.php in the magento-root/app/code/Vendor/Module/Model/MessageQueues/Product directory.
<?php
namespace Vendor\Module\Model\MessageQueues\Product;
use Psr\Log\LoggerInterface;
/**
 * Class Consumer
 * @package Vendor\Module\Model\MessageQueues\Product
 */
class Consumer
{
    /**
     * @var LoggerInterface
     */
    protected $logger;
    /**
     * Consumer constructor.
     * @param LoggerInterface $logger
     */
    public function __construct(LoggerInterface $logger)
    {
        $this->logger = $logger;
    }
    /**
     * Process the message from the queue
     * @param string $_data
     */
    public function processMessage(string $_data)
    {
        // Decode the JSON data to array
        $data = json_decode($_data, true);
               // Process the data (custom logic)
        $this->logger->info('Processing message from dckap_product_save queue: ', $data);
        // Example logic: Log product information
        if (isset($data['product_id'])) {
            $this->logger->info('Product ID: ' . $data['product_id']);
            // Additional processing logic here
        } else {
            $this->logger->warning('Invalid message received: ', $data);
        }
    }
}
Exchange and Binding Configuration
The queue_topology.xml file outlines the message routing rules and declares queues and exchanges.
Create queue_topology.xml in magento-root/app/code/Vendor/Module/etc folder:
<?xml version="1.0"?>
<config xmlns:xsi="http://www.w3.org/2001/XMLSchema-instance" xsi:noNamespaceSchemaLocation="urn:magento:framework-message-queue:etc/queue_topology.xsd">
<exchange name="dckap.magento.product.save" type="topic" connection="amqp">
<binding id="dckap_product_save" topic="dckap.magento.product.save" destinationType="queue" destination="dckap_product_save"/>
</exchange>
</config>Managing Consumers
To list available consumers, execute:
php bin/magento queue:consumers:listTo start a consumer, use:
php bin/magento queue:consumers:start consumerNameRabbitMQ and Magento 2 Integration
This guide covers the essentials of working with RabbitMQ, from understanding its core concepts to configuring it within a Magento 2 environment. Whether you’re new to RabbitMQ or looking to deepen your expertise, this resource provides a solid foundation for leveraging RabbitMQ’s capabilities in your projects.
Are you looking to implement RabbitMQ in your Magento 2 setup or need expert assistance to optimize your current configuration? Get in touch with Klizer for professional Magento Development services customized to your needs.
Contact us today to learn how we can help you streamline your workflows, enhance system performance, and get the most out of RabbitMQ in your business projects.