Adobe App Builder is a unified platform that allows developers to build custom applications and integrations to extend Adobe solutions. It supports single-page apps and microservices, leveraging serverless architecture and modern web technologies to simplify customization across products like Adobe Experience Manager (AEM) and Adobe Commerce.
ON THIS PAGE
Why use Adobe App Builder?
- Unified Development Framework: Streamlines building apps and integrations across Adobe solutions.
- Serverless Architecture: Reduces infrastructure management and scales automatically.
- Seamless Adobe Integration: Easily connects with Adobe Experience Manager, Adobe Commerce, and other products.
- Faster Time to Market: Modern tools and templates accelerate development.
- Secure & Scalable: Built on Adobe’s cloud, ensuring enterprise-grade security and reliability.
Core Components of Adobe App Builder
- SPAs using Adobe’s React Spectrum UI
- I/O Runtime, a serverless platform for backend services
- Developer tools: CLI, SDKs, Adobe APIs, auth, storage, and events
What are Adobe I/O Events?
Adobe I/O Events is a serverless, event-driven framework that lets you listen to and react to events happening across Adobe Experience Cloud or custom systems.
It enables real-time integration between:
- Adobe services (e.g., Experience Platform, Campaign, AEM)
- Custom apps built using Adobe App Builder
- External systems via webhooks or runtime actions
Setting up Adobe App Builder
Prerequisites
- Adobe Developer Console Account – developer.adobe.com/console
- Adobe I/O Project with Runtime enabled and Required APIs added (e.g., Adobe Campaign, Commerce, etc.)
- Node.js (LTS) and npm installed
- Adobe I/O CLI
| npm install -g @adobe/aio-cli aio login |
How to Create a new project in Adobe Developer Console
- Go to developer.adobe.com/console and Login with your Adobe ID (linked to your Experience Cloud org)
- Create a new project by selecting “create project from Template” and Select “App Builder” from the list of templates
- Enter a Project Title and App name for your App Builder Template Project. It has two workspaces by default – Stage and Production. Each workspace is provisioned with Adobe IO Runtime automatically
- Choose “API and Events” – to connect services like Adobe Campaign or Commerce and generate OAuth credentials as needed
- Now, sign in to the Adobe CLI and initiate the application by following the steps below
| aio loginaio app init <app-name> |
- Select the Organization, Project, and the workspace when prompted. With this, the application is initiated by installing the dependencies
Configure Adobe Commerce
- In the Adobe Developer Console, Click on the “Add Services” in the selected workspace and select API, and then select I/O Management API Under the Adobe Services.
- On the Configure API Page, Select OAuth Server to Server and Save Configured API
- Also, Add Adobe I/O Events for Adobe Commerce API and Save the Configured API.
- Now, download the .json file at the top right corner of the workspace overview page that generates the configuration of your workspace
- Now, install Adobe Commerce Eventing Module on Adobe Commerce using below command [If you are using Magento version 2.4.6 or higher, it is enabled automatically).
| composer require magento/commerce-eventing=^1.0 –no-updatecomposer update bin/magento setup:upgradebin/magento setup:di:compilebin/magento cache:clean |
Configure Adobe I/O Connection
In the Commerce Admin, navigate to Stores > Settings > Configuration > Adobe Services > Adobe I/O Events > General configuration and configure the below.
- Adobe I/O Authorization Type -> OAuth
- Adobe I/O Workspace Configuration -> Copy contents of the workspace configuration .json file
- Adobe I/O Event Provider Instance ID – Any unique value that identifies your instance, which allows commerce events to connect to the correct event provider. Then click on Save Configuration.
- After saving the configuration, click on Create an Event Provider, Enter an Event Label and Description, and then the Event Provider Id is created. You can also create the event provider from the command line.
- Then, Under Commerce Events, Enable Commerce Eventing by setting Enabled to Yes and providing Merchant ID and Environment ID, and save the configuration.
Example – Customer Login Event Registration and Subscription
- Create an action file in the app builder application directory path – actions/customer-login/index.js
| // Sample Action File (customer-login) async function main(params) { // Extract customer data from event const customer = params?.data?.value?.customer; if (!customer) { return { statusCode: 400, body: ‘Customer details not found in event payload’ }; } // Example: log or process customer info const { firstname, lastname } = customer; return { statusCode: 200, body: { Message: ‘Customer login event received’, firstname, lastname } }; } exports.main = main; |
- Now, run the below command to deploy it to the Adobe I/O runtime
| aio app deploy |
Once it is done, follow the steps below to subscribe and register events
Subscribe and Register Events
In Commerce, run the below command to subscribe to the customer_login function
| bin/magento events:subscribe observer.customer_login –fields=customer.firstname –fields=customer.lastname |
The Event Subscribe configuration information is stored in app/etc/env.php
- Now, return to your Project workspace, click on Add Services and Select Event and then select Commerce Events
- On the event configuration page, Select your event provider and click on the events to be subscribed
- Update the Event Registration name and Description, and select any of the event consuming steps as needed. For Example: Clicked on the customer-login action that was deployed previously to the application workspace.
- Now, whenever you login as a customer in the Commerce frontend, your action will be called. You will see the event is synchronized as below
- The Customer Login Event is captured and the FirstName and LastName is sent to Adobe I/O Runtime in App Builder. In Adobe I/O Runtime, the action is called that returns the FirstName, LastName and the message as “Customer Login Event Received”.
- You can expose your action as a Webhook URL (via Adobe App Builder) by deploying it to the application and using it in third-party platforms like Shopify or Salesforce to receive events.
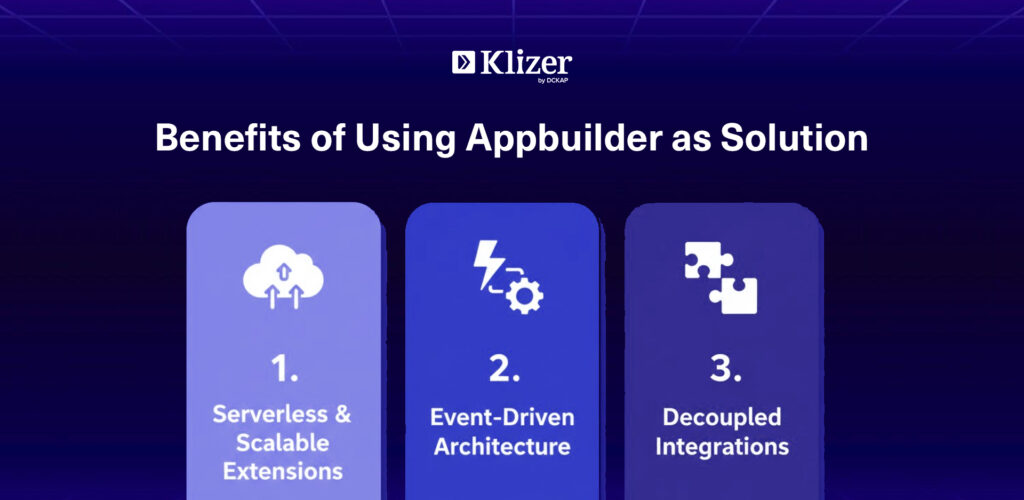
Benefits of Using Appbuilder as Solution
Read Next-Best Composable Commerce Solutions
1. Serverless & Scalable Extensions
- Build custom logic (pricing rules, payment flows, event handling) without hosting your own infrastructure.
- Automatically scales with traffic, so no need to manage servers for peak loads like holiday sales.
2. Event-Driven Architecture
- Adobe Commerce events (e.g., Product Save After, Order Place After) can directly trigger App Builder actions.
- Decouples custom logic from Commerce core → reduces upgrades issues and improves maintainability.
3. Decoupled Integrations
- Connect Commerce with external systems (ERP, PIM, DAM, CDP, CRM, 3rd-party APIs) without modifying Commerce core code.
- Ensures upgrades to Commerce don’t break integrations.
Conclusion
Using Adobe App Builder with Adobe Commerce helps you build custom features and connect with other systems without changing the core code. It’s flexible, scales easily, and works well with events like customer logins or order placements. This makes your system easier to update and maintain in the long run.
To get the best results, it’s a good idea to work with an Adobe development partner like Klizer who has the right experience and tools to support your project.