Modern web development requires your application to work well in different browsers and environments. End-to-end (E2E) testing helps you check how your app behaves in real use.
Playwright is an open-source tool from Microsoft that makes browser testing easier. It supports Chromium, Firefox, and WebKit, so you can test across all major browsers.
Whether your project is small or large, Playwright helps you test performance, user actions, and overall reliability. This guide will show you how to install Playwright and write your first tests.
ON THIS PAGE
What is a playwright?
Playwright is an open-source test automation library. It is supported by programming languages such as Java, Python, C#, and NodeJS. Playwright is licensed under Apache 2.0 License and is highly favored with NodeJS using Javascript/Typescript. This Playwright tutorial will guide setting up NodeJS in Visual Studio Code.
Playwright is a Node.js library initially developed at Microsoft that allows you to automate and control the browser for web scraping and testing. It has support for Java, Python, C#, and NodeJS programming languages. Playwright follows Apache 2.0 License and is used primarily with NodeJS and Javascript/Typescript. You can automate user interactions of the browser through Playwright, including clicks, form submission, keyboard interactions, network requests, and more.
This library is supported by the following browsers:
- Chrome (engine for Chrome and Edge)
- Firefox
- WebKit (Safari engine)
This cross-browser compatibility is one of the strongest aspects of Playwright, as it allows you to test that your web applications behave consistently across platforms.
What sets Playwright apart from the other browser automation software is that it can handle modern web apps and rich JavaScript interactions, thus able to be utilized to test single page applications (SPAs). Playwright also has functionalities such as start waiting, network interference, and file uploads, etc.
Why Use Playwright Automation?
While Playwright is new in the market, it is difficult to count its parameters for supporting various languages. Anyone who needs to migrate from Selenium to Playwright can do so very easily because Playwright supports C#, Java, and Python. Programming language is not a matter. Playwright was first released in January 2020 and has been in demand ever since.
- Cross browser testing: Unlike other software like Selenium, Playwright supports testing on the three most used browsers – Chromium, Firefox and WebKit. This ensures your application works no matter what browser you’re using.
- Faster tests: It runs many different types of tests across all browser versions, hence speeding up the process of testing.
- Headless mode: Playwright supports navigation in headless mode (no open windows), which allows for faster experimentation and suitability for continuous connectivity (CI).
- Automatic wait classes: Playwright waits automatically for objects to inspect, attach and be ready for execution, eliminating the need for explicit wait() communication and reducing latency in your tests.
- Network Interception: Playwright provides robust network traffic manipulation capabilities such as mocking API responses, line condition emulation, and test error handling.
- Powerful Editing Capabilities: Playwright has the Playwright Inspector, which is a utility that allows you to edit your tests, view the DOM and step levels directly.
What Do You Need Before Starting with Playwright?
Prerequisites:
Below are the need to have before you start with Playwright:
- Node.js and npm: Playwright builds on Node.js. Make sure you Download and have installed Node.js.
- JavaScript/TypeScript Knowledge: Tests for Playwright are authored in JavaScript (or TypeScript). Familiarity with these languages to a basic level will set you up nicely to start.
- A Text Editor or IDE: Get and install Visual Studio Code(VSCode) in order to author your tests.
- A Recent Web Browser: Install Chrome, Firefox, or Safari on your machine for testing purposes.
How to Install Playwright Step-by-Step?
Let’s start with playwright Installation. Follow the below steps to install Playwright and write your first test.
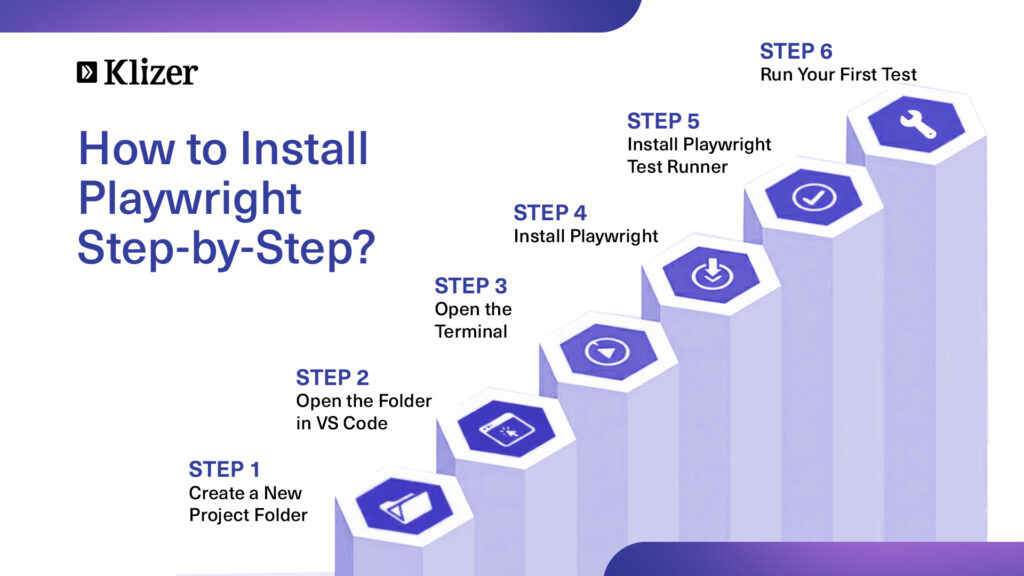
Step 1: Create a new directory
Open VS Code and Create a new directory (Eg: PlaywrightNew)
Step 2: Choose directory
In VS code, Click on File > Open Folder > Choose newly Created Folder (PlaywrightNew)
Step 3: Get Terminal
In VS Code, go to the Terminal menu and click on “New Terminal”.
Step 4: Install Playwright
Run the following command to start installing Playwright:
npm init playwright@latest
(Note: While running the above command, a few questions will be asked, provide appropriate inputs and here we are using typescript)
Step 5: Set Up Playwright Test Runner
Playwright comes with a built-in test runner that helps you run and manage tests more easily. To set up the Playwright test runner, execute the following:
npm install @playwright/test
The following operations are performed by adding the above command,
- Adds @playwright/test to your package.json under dependencies
- Installs it into the node_modules/ directory.
- Lets you write and run Playwright tests with the test, expect, and page APIs.
You’re now ready to write your first Playwright test.
Step 6: Run the test
To run the test, use the Playwright test driver:
npx playwright test
This will run the test within the browser as configured in the playwright.config file, if everything is properly configured. The tests run in headless mode, i.e., no browser window is opened during the execution of the tests, and the output is displayed in the terminal.
npx playwright test –headed
To run the test in headed mode, use the –headed argument. This will allow you to observe how the playwright is engaging with the site.
npx playwright test example.spec.js –headed
To run a specific test file in headed mode use the above command.
Debugging Tips:
Playwright offers native debugging capabilities to visually debug your tests.
Run in Debug Mode
Use this command to break at every step of your test and probe your app:
npx playwright test –debug
This launches Playwright Inspector, where you can:
- Step through test execution
- Step through test running interactively by hand
- Observe console logs and errors
Use PWDEBUG=1 for Debugging
You may also initiate debug mode in this way:
PWDEBUG=1 npx playwright test
This fails to close the browser when the test fails so that you can manually inspect the state.
HTML Report for Visual feedback:
Following the execution of tests, you are able to open and see a comprehensive HTML report:
npx playwright show-report
This opens up an interactive UI where you can:
- See pass/fail status
- Drill down into individual test steps
- See captured screenshots or videos (if enabled)
Tips for Writing Stable Playwright Tests
Below are the points will be useful to ensure the Playwright test are stable and efficient:
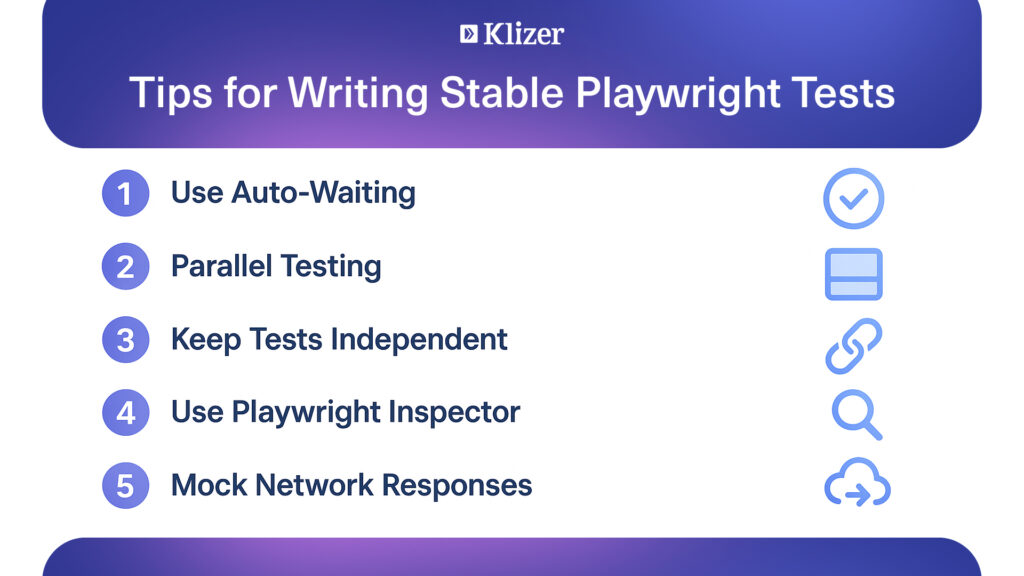
Use Auto-Waiting: Playwright automatically waits for elements to be available and present to interact with before it runs. Avoid using wait() or sleep() manually.
Parallel Testing: Playwright also allows you to run the tests in parallel. Use this feature to speed up your test suite, especially if you’re testing on multiple browsers.
Delete tests: Tests must be independent, i.e., one test should never affect the other. You can take advantage of the beforeEach and afterEach hooks so that you can ready and finalize your test environment.
Use Playwright Inspector: If a test is not working or is behaving erratically, use the Playwright Inspector to debug. It allows you to step through your test and mess around with the page visually.
Mock Network Responses: Playwright’s network response mocking feature allows the interception and modification of network requests and responses made by a web page during testing.
What’s Next?
Now that you’ve written and run your first Playwright tests.
Next Steps:
- Integrate Playwright with your CI/CD pipeline (GitHub Actions, Jenkins, etc.) for automated builds.
- Explore Playwright Test Fixtures, custom reporters, and multi-browser test strategies.
Conclusion
Playwright is an easy and useful tool for testing web applications. It helps you check how your site works in different browsers and makes your tests faster and more reliable. Once you learn the basics, you can explore more features, connect it to your CI/CD pipeline, and build better testing for your projects.
If you’re looking for expert guidance in scaling your testing or improving your application performance, contact an enterprise ecommerce solution partner like Klizer